Snapseed
Screenshots
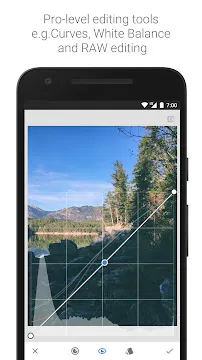
Snapseed is a professional-grade photo editing application developed by Google. It offers a wide array of tools that cater to both beginners and seasoned photographers. You can transform your mobile photos from simple snapshots into stunning works of art with just a few taps. The app is completely free to download and does not contain annoying advertisements or hidden subscription fees.
This application provides a user-friendly interface that prioritizes your workspace. When you open an image, you see a clean layout that puts the focus on your photo. You can navigate through various filters and manual adjustment tools with ease. Snapseed supports high-quality file formats, including RAW files, which gives you maximum control over your editing process.
How To Download And Install Snapseed APK For Android
If you want to edit photos like a pro on your phone, Snapseed is a top choice. Google created this application to provide professional tools for free. Many users prefer the APK version to get specific updates or access the app in different regions. This guide explains how to download and install the Snapseed APK on your Android device safely.
Why Use the Snapseed APK?
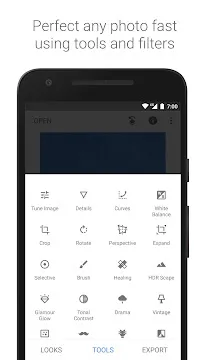
Downloading the APK file allows you to control which version of the app you use. Sometimes, official stores delay updates or remove features. By using an APK, you can find the exact version that fits your needs. Snapseed offers over 25 tools, including healing brushes and RAW support. You can fix colors, adjust brightness, and remove unwanted objects easily.
Preparing Your Android Device
Android phones have security settings to prevent unknown installations. You must change these settings before you begin. This process ensures your phone accepts the file you download.
- Open the Settings menu on your phone.
- Go to the Security or Privacy section.
- Look for the option labeled Install Unknown Apps.
- Select your web browser (like Chrome).
- Toggle the switch to Allow from this source.
Step 1: Downloading the Snapseed APK
First, you need to find a safe file. Look for websites that verify files to avoid malware. Avoid any site that asks for payment, as Snapseed is a free tool.
- Open your mobile browser.
- Visit Filetomob.com.
- Search for “Snapseed APK Download”.
- Click the download button on your chosen site.
- Wait for the file to save to your Downloads folder.
Step 2: Installing the File
Once the download finishes, you can start the installation. This part is quick and simple.
- Open your File Manager app.
- Navigate to the Downloads folder.
- Tap on the Snapseed APK file.
- A pop-up window will ask for your permission.
- Tap Install and wait for the progress bar to finish.
- Click Open to launch the application.
Getting Started with Snapseed on Android
Editing photos on your phone should be simple and fun. Snapseed makes this possible by offering professional tools without a complex price tag. This guide helps you navigate the first steps on your Android device. You will learn how to set up the app, find your photos, and master the unique controls.
Essential Initial Setup
When you first open the app, you must handle permissions. Modern Android versions require specific approvals to ensure your data stays safe.
- Storage Access: The app needs to see your files to edit them. Tap “Allow” when the app asks for photo and media access. This lets the app save your finished work back to your device.
- Camera Permission: You might want to take a new photo directly through the app. Granting camera access enables this feature.
- Notification Settings: You can choose to receive alerts. However, most users find these unnecessary for a photo editor.
Importing Your Photos
Getting your images into the workspace is the next step. The app offers several ways to find your favorite shots.
From Your Gallery
The most common method is using your local gallery. Tap the large plus (+) icon on the main screen. This action opens your recent photos. You can scroll through your images and tap one to start editing.
Using the Camera
If you want to capture a fresh moment, use the camera option. Tap “Open” in the top left corner and select “Camera.” This opens your phone’s default camera app. Once you take the shot, the app loads it automatically for editing.
From an SD Card
Many photographers use SD cards for extra storage. To access these, tap “Open” and navigate to the sidebar menu. Look for your SD card’s name. This allows you to edit high-quality photos directly from your external storage.
Navigating the Interface
The design is clean and minimalist. It does not clutter your screen with icons. Instead, it relies on smart gestures and hidden menus.
- The Main Workspace: Your photo stays at the center. You see three main tabs at the bottom: Looks, Tools, and Export.
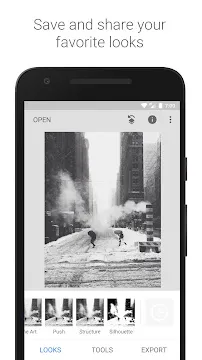
- Looks Tab: This area contains quick presets. You can apply a specific style with a single tap.
- Tools Menu: This is where the magic happens. It contains over 25 features like Tune Image, Healing, and Perspective.
- Export Tab: Use this when you finish your masterpiece. It allows you to save, share, or create a copy of your photo.
Mastering Gesture Controls
You do not just tap buttons in this app; you swipe. This method gives you precise control over every change.
- Vertical Swipes: Swipe up or down on the photo to choose a specific adjustment. For example, in “Tune Image,” you can switch between Brightness and Contrast.
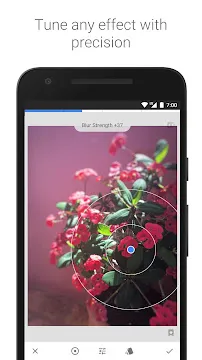
- Horizontal Swipes: Swipe left or right to change the intensity of the effect. Swiping right increases the value, while swiping left decreases it.
- The Comparison Tool: Press and hold the icon in the top right corner. This lets you see your original photo. Release it to see your current edits.
Using these gestures feels natural after a few minutes. You can focus on the image rather than searching for small sliders. Following these steps ensures a smooth start to your creative journey.
Snapseed: Essential Tools for Everyday Edits
Snapseed remains a top choice for mobile photographers who want professional results without a steep learning curve. The app provides a clean interface that hides a deep set of features. Whether you want to fix a dark photo or add artistic flair, these essential tools help you master everyday edits.
Master the Basics with Tune Image
The Tune Image menu acts as the heart of your editing process. Most users start here to balance the fundamental light and color of their shots.
- Brightness: Use this to lighten or darken your entire image. It helps recover details in shadows or tone down a bright sky.
- Contrast: This tool adjusts the difference between light and dark areas. High contrast makes colors pop, while low contrast creates a soft, vintage look.
- Saturation: Slide this to make colors more vivid or more muted.
- Ambiance: This tool is your secret weapon. Unlike standard brightness, Ambiance controls the light balance across the whole frame simultaneously. It fills in shadows and tames highlights without making the photo look flat. It creates a natural, HDR-like effect that makes dull photos look professional.
Sharpen Your Vision with Details
The Details tool helps you define the textures in your photo. Many people confuse the two main settings, but they serve very different purposes.
Structure vs. Sharpening
Structure brings out the “pop” in your photo. It increases the local contrast of textures without adding harsh edges. It works wonders on subjects like old wood, stone walls, or clouds. Avoid using high structure on skin, as it can highlight wrinkles and pores.
Sharpening focuses on the fine edges of your image. It makes blurry lines look crisp. Use this at the very end of your edit to give the photo a finished, high-definition look. Be careful not to overdo it, or your image will look grainy and artificial.
Perfect Your Frame with Crop and Rotate
Composition matters more than almost any other factor in photography. Even a great shot can fail if the horizon is tilted or the subject is off-center.
- Crop: Use standard aspect ratios like 4:3 or 1:1 for social media. Cropping allows you to remove distracting elements from the edges of your frame.
- Rotate: If your horizon looks slanted, the auto-rotate feature often fixes it instantly. You can also manually slide your finger to align the lines perfectly.
- Perspective Correction: Sometimes, buildings look like they are leaning backward. The Perspective tool lets you tilt the photo vertically or horizontally. Snapseed even fills in the empty edges automatically using smart technology.
Fix Lighting with White Balance
Incorrect lighting often creates “color casts.” A photo taken indoors might look too yellow, while a snowy scene might look too blue. The White Balance tool fixes these issues quickly.
- Temperature: Move the slider toward blue to cool down a warm photo. Move it toward orange to add a sunset glow to a cold scene.
- Tint: This corrects green or magenta shifts. It is particularly useful when shooting under fluorescent lights.
- The Dropper Tool: Tap the eye-dropper icon and touch a neutral gray or white area in your photo. Snapseed will calculate the perfect color balance for you automatically.
Using these tools in sequence allows you to turn a simple snapshot into a high-quality image. Start with basic lighting, fix the composition, and finish with texture and color correction for the best results.
Snapseed on Android: 4 Advanced Features
Snapseed remains a top choice for mobile photographers who want professional results on their Android devices. While many apps offer basic filters, Snapseed provides advanced tools that give you total control over your images. You can transform a simple snapshot into a polished piece of art using its high-end features.
Precise Editing with Selective Adjustments
The Selective tool is one of the most powerful features in the app. It uses “Control Points” to apply edits to specific areas rather than the entire photo. This allows you to fix a dark face without overexposing a bright sky.
- Place a Point: Tap the specific area you want to change.
- Adjust Size: Pinch with two fingers to increase or decrease the affected area. A red overlay shows you exactly what the tool targets.
- Change Settings: Swipe up or down to choose between brightness, contrast, saturation, or structure.
- Apply Intensity: Swipe left or right to increase or decrease the effect.
This technology identifies similar colors and textures near your control point. It makes complex selections feel effortless and fast.
Remove Distractions with the Healing Tool
Unwanted objects can ruin a great composition. The Healing tool lets you remove these distractions with a simple tap. It works exceptionally well on Android touchscreens because you can use your finger as a brush.
- Zoom in for Detail: Use two fingers to zoom deep into the photo for better accuracy.
- Brush the Object: Run your finger over the item you want to delete.
- Automatic Replacement: The app analyzes the surrounding pixels and fills the space seamlessly.
This tool is perfect for removing power lines, trash on a sidewalk, or skin blemishes. For the best results, use small strokes instead of covering a large area all at once.
Master Your Lighting with the Brush Tool
The Brush tool offers even more manual control than selective points. It acts like a digital paintbrush that lets you “mask” effects onto specific parts of your image. You can choose from four different brush types:
- Dodge & Burn: Lighten or darken specific areas to add depth.
- Exposure: Fix specific spots that are too bright or too dark.
- Temperature: Add warmth to a sunset or cool down a shadowy corner.
- Saturation: Make colors pop in one area while leaving the rest neutral.
Fix Architecture with the Perspective Tool
When you photograph tall buildings from the ground, they often look like they are leaning backward. This is called “keystoning.” The Perspective tool fixes these lens distortions instantly.
- Tilt and Rotate: Move the photo vertically or horizontally to straighten lines.
- Free Transform: Drag the corners of the image to manually align the edges.
- Smart Fill: When you tilt the photo, empty white spaces appear at the edges. Snapseed uses AI to fill these gaps automatically by copying nearby patterns.
Using this tool ensures your architectural shots look professional and geometrically correct.
By mastering these four advanced features, you can move beyond simple filters. You gain the ability to fix mistakes and highlight the best parts of every photo you take on your Android phone.
Snapseed: Creative Filters & Looks
Snapseed remains a top choice for photo editing on Android. This app combines professional tools with an interface that is easy to navigate. Whether you want a quick fix or a deep creative overhaul, this application provides the necessary features.
One-Tap Magic with Looks
The Looks tab is the first thing you see when you open an image. These presets offer an immediate transformation for your photos. They analyze your image and apply several adjustments at once.
- Accentuate: This preset boosts details and contrast. It makes your subject stand out without looking over-processed.
- Smooth: This is perfect for portraits. It softens skin tones and creates a gentle, clean appearance.
- Pop: Use this to increase saturation and brightness. It works well for food photography or vibrant landscapes.
These presets act as a great starting point. You can apply a Look and then move to the Tools menu to fine-tune the results.
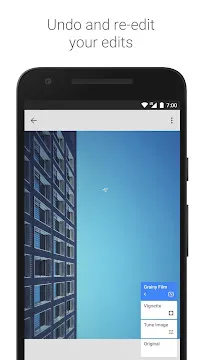
Add Character with Grainy Film
Digital photos often look too sharp or clinical. The Grainy Film tool solves this by mimicking the appearance of classic color film. It adds a textured, organic feel to your shots.
You can select from various film styles that change the color profile of your photo. Once you pick a style, you have full control over the settings. You can increase the Grain to make the texture more visible. You can also adjust the Style Strength. If you want the texture but prefer your original colors, simply turn the style strength down to zero.
Retro Vibes with Retrolux
If you enjoy a vintage aesthetic, Retrolux is the tool for you. It creates images that look like they came from an old film camera. This tool focuses on unpredictable and artistic imperfections.
- Light Leaks: These add streaks of light that look like light hitting old film.
- Scratches: This adds dust, dirt, and line marks to the image.
- Film Styles: You can choose from many different color shifts.
The “randomize” button is a fun feature here. It swaps the leak patterns and scratches instantly. You can keep tapping until you find a combination that fits your vision.
Powerful Double Exposure
The Double Exposure tool is surprisingly deep for a mobile app. It allows you to blend two different images into one. This technique creates surreal and artistic compositions.
After you select your second photo, you can move and resize it independently. The app offers several blend modes, such as Lighten, Darken, or Overlay. These modes change how the colors and shadows of the two images interact. You can also adjust the transparency to make the second image more or less visible.
Using the “View Edits” stack allows you to mask out specific parts of the second image. This gives you the power to place an object from one photo into the background of another with high precision.
Snapseed: Step-by-Step Workflow Example
Transforming a flat, dull outdoor photo into a masterpiece doesn’t require a desktop computer. Snapseed offers professional tools right on your Android device. This guide shows you how to use a simple workflow to make your images pop. Follow these steps to turn a muted landscape into a vibrant, high-quality photograph.
Getting Started with Snapseed
First, you must open the app and select your photo. Snapseed works best when you start with a clear goal. For this example, we want to fix a flat outdoor shot. A flat photo usually lacks contrast and deep colors.
Step 1: The Initial Tune
Begin by tapping the Tools menu and selecting Tune Image. This tool acts as the foundation of your edit.
- Tap the Magic Wand icon for an auto-adjustment.
- This gives the app a chance to balance the exposure.
- Swipe up or down on the screen to see the manual options.
While auto-adjust helps, manual control gives you the best results. You want the light to look natural but energized.
Enhancing Mood and Color
Once the basic lighting looks good, you need to focus on the “feel” of the image. This is where Ambiance and Saturation come into play.
Step 2: Ambiance and Saturation
Ambiance is a unique Snapseed feature. It controls the balance of light in a way that mimics HDR. It fills in shadows and tames highlights simultaneously.
- Increase Ambiance to +30. This creates a balanced look across the entire frame.
- Next, select Saturation.
- Increase Saturation to +15.
By doing this, you make the colors more vivid without making them look fake. The grass looks greener, and the sunlight looks warmer.
Targeting Specific Areas
Outdoor photos often have a bright sky that looks washed out. If you apply an effect to the whole photo, you might ruin the foreground. Use the Selective tool to fix this problem.
Step 3: Precise Sky Edits
The Selective tool allows you to place a control point on a specific color or area.
- Tap the Selective tool.
- Tap the blue area of the sky.
- Pinch with two fingers to adjust the size of the affected area.
- Swipe right to increase contrast.
This makes the clouds stand out against the blue. It adds depth to the top of your photo.
Adding Sharpness and Detail
A vibrant photo also needs to look crisp. If the image looks soft, it won’t grab attention.
Step 4: Refining with Details
Go back to the Tools menu and choose Details. You will see two options here: Structure and Sharpening.
- Focus on Structure.
- Set Structure to +20.
Structure enhances the texture of objects like rocks, trees, or buildings. It adds a “crunchy” look to the edges without adding the digital noise that sharpening often creates. Your photo will now look much more professional and defined.
Saving Your Work
The final step is just as important as the editing. You must save the file correctly to keep all that new detail.
Step 5: High-Quality Export
Don’t just take a screenshot of your edit. Use the export function to maintain clarity.
- Tap Export.
- Go to the app settings first to ensure your “Format and Quality” is set to JPG 100%.
- Select Export to save a permanent copy to your gallery.
Now you have a vibrant, balanced image ready for sharing. This workflow ensures your outdoor photos look intentional and polished every time.
Snapseed for Android: Expert Editing Tips
Editing photos on an Android device requires the right tools and techniques. Snapseed remains a top choice for mobile photographers who want professional results without a steep learning curve. While the app is available on multiple platforms, Android users have specific advantages. By following these tailored tips, you can improve your workflow and image quality.
Adjust Settings for High-Quality JPG Compression
By default, many apps compress photos to save space. This often results in a loss of detail and “artifacts” in your images. You should change your settings to ensure your hard work looks sharp when you export it.
- Open the Snapseed app on your Android device.
- Tap the three vertical dots in the top-right corner to open the menu.
- Select Settings.
- Find the Format and quality option.
- Change the setting to JPG 100%.
Using the 100% setting prevents the app from discarding data during the save process. This is vital if you plan to print your photos or share them on high-resolution displays.
Create and Save Custom Looks
Consistency is key for a professional social media presence. If you frequently edit Instagram stories, you likely use the same set of filters and adjustments. Instead of repeating the same steps for every photo, you can save your favorite edits as a Look.
- Complete your full edit using the Tools menu.
- Navigate to the Looks tab at the bottom of the screen.
- Scroll to the far right of the preset list.
- Tap the Plus (+) icon.
- Name your new style and save it.
Now, you can apply this exact style to any future photo with a single tap. This saves time and ensures your brand or aesthetic remains uniform across all your posts.
Integrate with Google Photos
Most Android users rely on Google Photos for storage. You can create a seamless workflow between these two applications. Before you start a heavy edit, ensure your original image is backed up to the cloud.
When you finish an edit in Snapseed, use the Export function. Choose Save a Copy rather than “Save.” This creates a new file while keeping the original version intact. Because Snapseed creates its own folder on your device, Google Photos can automatically detect and back up these edited versions. This setup provides a safety net for your creative work.
Utilize Split-Screen for Side-By-Side Comparisons
If you use a tablet or a large Android phone, you can take advantage of split-screen mode. This is particularly helpful for comparing your edited version with the original or a reference photo.
- Open Snapseed and your gallery app.
- Use the Android multitasking view to trigger split-screen.
- Place Snapseed on one side and your reference image on the other.
This allows you to match colors and tones more accurately. While Snapseed has a “Compare” button that you can press and hold, the split-screen method lets you see both versions continuously. It is a great way to judge the progress of your edit without toggling back and forth.
Frequently Asked Questions About Snapseed for Android
What is Snapseed exactly?
Snapseed is a free mobile editing app. It lets you change your photos in many ways. You can crop, adjust lighting, or add filters. Google developed this tool for Android users. It focuses on detailed, non-destructive editing.
Is Snapseed really free to use?
Yes, it is completely free. You do not pay any subscription fee. There are no hidden costs for filters or tools. All features are open to every user. You can download it from the Google Play Store without spending money.
What editing tools does it include?
The app offers a wide range of tools. For example:
- Tune Image for brightness and contrast.
- Selective Adjustments to fix only one part of a photo.
- Healing to remove spots or small objects.
- Curves for precise color control.
- White Balance to fix color casts.
- Details to sharpen or add structure.
You also get filters like Vintage, Grunge, and Noir. Each tool works with simple finger swipes.
Can Snapseed edit RAW photos on Android?
Yes, Snapseed handles RAW files effectively. Most Android phones now allow you to shoot in DNG format. When you open a DNG file, Snapseed automatically opens the Develop tool.
- Exposure: Adjust the light levels without losing detail.
- White Balance: Fix the color temperature of your shot.
- Non-destructive: Your edits do not ruin the original file data.
How do I remove unwanted objects from my photos?
You can use the Healing tool to clean up your images. This feature helps you remove small distractions like trash, power lines, or skin blemishes.
- Open your photo in the app.
- Tap on Tools and select Healing.
- Zoom in on the object you want to remove.
- Brush over the object with your finger.
- The app replaces the area with matching pixels from the surroundings.
Does Snapseed support layers?
Snapseed uses a system called Stacks instead of traditional layers. Every change you make is saved as a separate step. You can go back and change any specific edit at any time.
- Tap the Edit Stack icon at the top of the screen.
- Select View Edits to see your history.
- Tap a specific tool in the list to change its settings or delete it.
How can I change the background of a photo?
You can blend two images using the Double Exposure tool. This allows you to place a subject from one photo onto a new background.
- Open your main image.
- Select Double Exposure from the tools menu.
- Add a second photo.
- Use the Edit Stack and the Brush tool to mask out the areas you do not want.
Why is my edited photo blurry?
Sometimes photos look less sharp after saving. Check your export settings to ensure high quality.
- Go to Settings within the app.
- Look for Image sizing.
- Select “Do not resize” to keep the original resolution.
- Check the Format and quality setting and set it to 100%.
Can I save my favorite edits to use later?
Yes, you can create your own filters. These are called Looks.
- Edit a photo until you are happy with the result.
- Go to the Looks tab.
- Scroll to the end and tap the Plus (+) icon.
- Give your look a name.
- Apply this look to any future photo with a single tap.
Can I use Snapseed as a camera app?
While Snapseed began as an editor, recent updates have changed how it works. You can now access a camera mode directly within the app.
- Pro Mode: Use manual controls for ISO, shutter speed, and focus.
- Film Styles: Capture photos that look like they were shot on classic film.
- Live Looks: Apply your saved “Looks” while you are taking the picture.
- Availability: This feature is currently rolling out to newer Android devices.
What is the “Object Brush” tool?
Google recently introduced a powerful tool called Object Brush. It uses artificial intelligence to make selecting parts of your photo much easier.
- Fast Selection: Simply tap or draw a quick line over an object.
- AI Detection: The app identifies the entire object in milliseconds.
- Precise Edits: Once selected, you can change the color or brightness of just that one item without touching the background.
Can I share my edit settings with friends?
Yes, you can share your entire editing process using QR Looks. This is one of the most unique features of the app.
- Create a Code: Open the Edit Stack and select QR Look.
- Generate: Tap Create QR Look to produce a code for your specific edit.
- Share: Your friends can scan this code with their phone camera.
- Apply: Their Snapseed app will automatically apply every single tool and setting you used to their own photo.
Does Snapseed work without an internet connection?
Snapseed is a great choice for travel because it does not require data.
- Offline Tools: Every filter and adjustment tool works fully offline.
- Privacy: Since the processing happens on your device, your photos are not uploaded to a cloud server for editing.
- Speed: Editing is fast because the app uses your phone’s local processor.
-
PowerDirector
 Download
PowerDirector - Video Editor
PowerDirector offers an incredible video editing experience...
- VITA – Video Editor & Maker
- Amazon Photos
- CapCut
- TIDAL Music
- Blurrr
- Apple Music
- Photo Editor